
Hey, Mac photography 📸 champs! 💻 It's time to unleash the secret power of preserving your beloved memories on your favorite machine. Those "you had to be there" moments are priceless, and losing them would be devastating. This blog will guide you through the simple yet mighty process of backing up your photos on your Mac. Ready to embark on this photo-saving adventure? Let's do this!
Why Backing Up is a Must

Before we dive into the backup bonanza, let's talk about the why behind this whole shebang. Your Mac 🖥️ is your trusty companion, but it's not immune to tech hiccups or ☕ coffee spills. Losing your photos could be like losing a piece of your heart! 💔 That's why backing up is crucial; it's like having a safety net for your memories. So, let's put on our photo-saving capes and start backing up like pros!
Step 1: Time Machine to the Rescue
Meet your Mac's knight in shining armor: Time Machine! It's not a sci-fi movie plot; it's the built-in backup superhero ready to save the day. All you need is an external hard drive to be Time Machine's loyal sidekick. Plug in that bad boy, and let's get started!
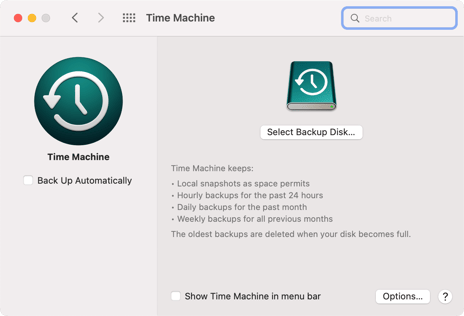
- Click on the Apple logo in the top-left corner, and choose "System Settings."
- Click on "General" then click on "Time Machine," and then hit "Select Backup Disk."
- Choose your external hard drive from the list, and click "Use Disk."
- Boom! Time Machine is activated and will back up your entire Mac, including those precious photos, every hour.
Step 2: iCloud - Your Cloud-based Guardian
.png?width=202&height=202&name=icloud%20(1).png)
Let's sprinkle some magic on your Mac photo backup with iCloud. It's like having your very own digital guardian angel watching over your pictures. Plus, it comes with extra perks like accessing your photos from anywhere. All set? Here's how to do it:
- Click on the Apple logo, and go to "System Preferences."
- Click on "Apple ID" and select "iCloud" from the menu on the left.
- Turn on the "Photos" option, and you're good to go! Your Mac will sync your photos to the iCloud cloud like a pro.
Step 3: Double the Fun - Use Both Time Machine and iCloud
Why settle for one when you can have the best of both worlds? Time Machine provides a local backup on your external hard drive, while iCloud saves your photos in the cloud. It's like having a backup fortress! With this dynamic duo on your side, you can rest easy knowing your memories are double-protected.
Step 4: Embrace the Zen of Organization
Okay, let's talk about the nitty-gritty of backing up photos - organization! Before you unleash your photo-saving powers, take a moment to tidy up your photo library. Create folders for different events or occasions. Trust me, it's like a digital Marie Kondo-ing of your memories, and you'll feel the peace and serenity of an organized photo universe.
Step 5: External Hard Drive Extravaganza
Don't want to rely solely on iCloud or Time Machine? You do you, my friend! An external hard drive will be your trusty sidekick for a manual backup party. Simply connect that shiny new hard drive to your Mac, and drag and drop your precious photos into it. Boom! You've created your photo sanctuary outside of your Mac.
Step 6: Regular Backup Check-ins
Life is like a 🎢 rollercoaster, and your photo backups should keep up with the ride. Whenever you snap new photos or make changes, remember to keep your backups updated. Plug in that external hard drive regularly or check your iCloud to ensure everything's in tip-top shape. It's like giving your memories a check-up!
Step 7: Deleting Isn't Goodbye
Heads up - deleting photos from your Mac doesn't mean they're gone forever. If you're using iCloud, they'll be floating happily in your cloud account, ready for a second chance. And with Time Machine, you can travel back in time and recover those accidentally deleted masterpieces. So, breathe easy, my friend!
Step 8: Sharing the Knowledge
You're now a photo-backup guru, and the world needs to know! Share these tips with your fellow Mac enthusiasts, and they'll thank you when their precious memories are safe and sound too. Let's create a backup revolution!
Step 9: Celebrate Your Backup Victory
Congratulations! 🎉 You've mastered the art of backing up photos on your Mac. Now you can snap away without fear, knowing that your memories are protected. Next, let's talk about why you should consider Photobucket as an additional backup option for your Mac, even if you already use iCloud and Time Machine.
Part 2: Say Hello To Photobucket

If you're looking for a photo-saving superhero with a splash of extra sauce, Photobucket photo storage and video storage is ready to help! 💥 Photobucket's online image and video hosting service takes your photo backup game to a whole new level. It's not about replacing iCloud or Time Machine; it's about having a robust, multi-layered strategy to ensure your photo memories remain safe, accessible, and shareable for years to come. Plus, Photobucket's My Bucket Plan with one terabyte of storage for only $5 a month is enough space for 500,000 photos. Ready to rock? Let's see how Photobucket can turn you into a photo-saving superstar!
Step 1: Meet Your Photobucket Pal
First things first, let's introduce you to your new backup BFF - Photobucket! It's like a cozy digital attic for your precious photos, ready to keep them safe 🔒 and accessible ⏰ 24/7. So head to Photobucket's website, sign up for an account, and let the 💫 magic begin!
Step 2: Upload Your Photos with a Snap
Now that you're all set up with Photobucket, it's time to upload those treasured memories. Click on the "Upload" button, and select the photos or folders you want to add to your ☁️ cloud-based sanctuary. Photobucket even has a neat drag-and-drop feature, making the whole process a piece of cake!
Step 3: Photo Organization Zen
Photobucket knows that staying organized is key to photo happiness. Create albums, tag people and place, and sort your photos into different categories like a pro. Family gatherings, dreamy vacations, or even epic fails - you name it! Your memories will be neatly arranged, and you'll have more time to cherish the moments rather than searching for them.
Step 4: Auto Backup - The Backup Magician
Wish your backup process could be more like magic? Photobucket grants your wish with its Auto Backup feature. Turn it on, and watch the 🎩 magic happen! Your Mac's photos will sync effortlessly to your Photobucket account in the background. It's like having a photo-saving magician on call!
Step 5: Access Anywhere, Anytime
Photobucket knows you're a 🌏 globetrotter, and your memories should be too. With this fantastic tool, you can access your photos from any device with an internet connection. Whether it's your Mac, iPhone, Android, PC, or tablet, your memories are just a few taps away. Now that's what I call photo liberation!
Step 6: Share the Joy
Photobucket doesn't just save your photos; it's also a fantastic platform for sharing your cherished moments with your loved ones. Send them a link to an album, and they can join the memory party with you. It's like having your own digital storytelling gallery!
Step 7: Celebrate Your Memories
With your photos safely backed up on Photobucket, you can now let your creativity flow. Create fun collages, personalized photo books, or even wall art to celebrate the best moments of your life. The possibilities are endless, and Photobucket is your creative genie! 🖼️
Step 8: Spread the Photobucket Love
Now that you're a pro at backing up photos with Photobucket, it's time to spread the ❤️ love! Tell your friends, family, and even that friendly barista who always gets your ☕ coffee order right. Show them how Photobucket can be their photo-saving sidekick too. Let's create a photo-saving revolution together!
Step 9: Have Fun Snapping Away!
Now that you've mastered the art of backing up photos on your Mac with the help of Photobucket, it's time to grab that camera and go wild! Snap away, knowing that your memories are safe and sound, ready to be cherished for years to come.
So there you have it - the ultimate guide to backing up photos on your Mac and how Photobucket can give it that extra oomph! Keep being the photo-saving superstar you are, and let's capture life's beautiful moments together! 🌟📷