In this digital age, our smartphones have become our trusted companions for capturing our precious memories. Whether it's a breathtaking sunset or a fun selfie with friends, we rely on our Android devices to store these cherished moments. However, accidents happen, and losing those photos can be heartbreaking. That's why it's crucial to back up your photos regularly. In this blog, we'll show you how to back up Android photos using Photobucket, a user-friendly and reliable cloud storage service. So, let's get started and ensure your memories stay safe and sound!
Step 1: Download and Install Photobucket
First things first, head to the Google Play Store on your Android device and search for "Photobucket." Tap on the app, hit "Install," and wait for the magic to happen. Once it's installed, open the app and create a new account or log in if you already have one. Remember to choose a strong password to protect your account.
Step 2: Set Up Auto Backup
Now that you have Photobucket on your Android device, let's enable the Auto Backup feature. This nifty feature automatically saves your newly taken photos to your Photobucket account, ensuring you never miss a shot.
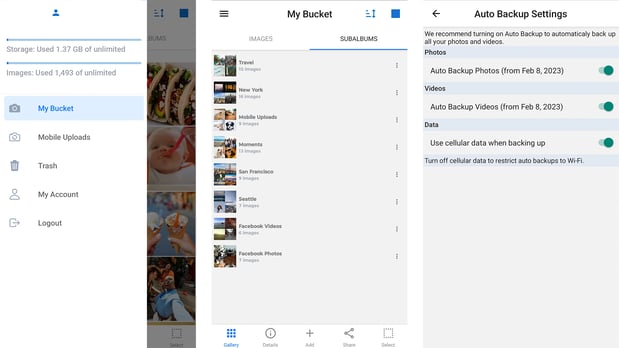
Open the Photobucket app and tap on the menu icon (usually represented by three horizontal lines). From the menu, select "Settings" and then "Auto Backup." Toggle the switch to "On" to activate the feature. You can also customize the settings to choose which folders or albums you want to include in the auto-upload process. Once you're satisfied, hit "Save."
Step 3: Check Auto Backup Settings
It's important to make sure the Auto Backup settings are configured correctly. Open the app's settings again and select "Auto Backup." Check if you want to back up all your photos and videos, or just new ones. You can also choose whether to enable Auto Backup only when connected to Wi-Fi or use mobile data as well.
Step 4: Review and Organize Albums
Photobucket allows you to create albums to keep your photos organized. Open the app and tap on the "+" icon at the bottom of the screen to create a new album. Give it a catchy name like "Beach Adventures" or "Family Fun," and hit "Save."
To move your existing photos into albums, open the "Library" section within the app. Select the desired photos by tapping on them, and then tap the "Move to Album" option. Choose the appropriate album to move the photos there. This way, you can easily find and browse specific sets of photos whenever you want.
Step 5: Verify Backups and Access Photos
Now that your auto-upload settings are in place and your albums are organized, it's time to ensure your photos are safely stored in Photobucket. Open the app and navigate to the "Library" section. You should see your recently backed-up photos in the "Camera Roll" or "All Photos" section.
To access your backed-up photos on other devices or computers, head to the Photobucket website and log in using your account credentials. From there, you can view, download, or share your photos with family and friends.
Congratulations! You've successfully learned how to back up Android photos using Photobucket. With Auto Backup enabled, your precious memories will be safe from unexpected mishaps like lost or damaged devices. Remember to periodically check your Photobucket account to ensure your photos are being backed up correctly. Now, go forth and capture more amazing moments without worrying about losing them.
Happy snapping!