Hey there, fellow video enthusiasts! Whether you're a budding filmmaker or just someone who loves capturing precious moments on your camera, it's essential to protect your videos from accidental loss or damage. One of the best ways to safeguard your cherished memories is by backing them up online. In this blog post, we'll explore how you can easily store videos online, ensuring that they're safe and sound for years to come. So, grab your popcorn and let's get started!
-
Choose the Right Cloud Storage

When it comes to storing videos online, cloud storage is your best friend. There are plenty of options out there, including Photobucket, which is a trusted video storage and photo storage service that has been helping people safeguard their videos and photos for over 20 years! Choose a cloud storage service that suits your needs, provides ample storage space, and offers a user-friendly interface.
-
Download the Photobucket app

One of the best parts of Photobucket is our app. You can download the app to your phone and easily upload and access your photos and videos on the go. -
Organize Your Videos

Before you start uploading your videos, take a moment to organize them into albums. Create folders and categorize your videos based on events, dates, or themes. This will make it easier to locate specific videos when you need them later on. Plus, it'll save you from the hassle of scrolling through an endless list of files. You can even add tags to your photos and videos to make them even easier to find.
-
Upload in Batches

Uploading a large number of videos at once can be time-consuming, especially if you have a slower internet connection. Instead, upload your videos in batches. Start with a few videos and let them upload in the background while you go about your day. Once they're done, move on to the next batch. This way, you won't have to sit around waiting for all your videos to finish uploading.
-
Set Up Automatic Backups
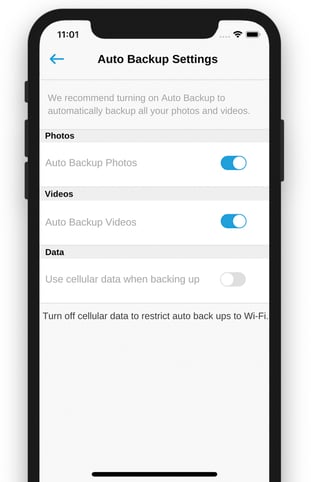
To ensure that your videos are always backed up, take advantage of the automatic backup features offered by most cloud storage platforms, including Photobucket. By enabling the Auto Backup feature, your videos will be automatically synced and backed up whenever you connect your device to the internet. It's a hands-off approach that gives you peace of mind, knowing that your videos are being taken care of without any extra effort.
-
Double-Check Your Backups
.jpg?width=500&height=351&name=cloud-storage-data-concept%20(1).jpg)
After you've uploaded your videos, take a moment to double-check that everything has been successfully backed up. Open your cloud storage app or website and verify that all the files are present and accessible. This way, you can catch any potential issues early on and address them before it's too late.
-
Share and Collaborate

One of the fantastic benefits of online video backups is the ability to easily share and collaborate with others. Whether you want to show off your latest creation to friends or work on a project with a team, cloud storage platforms offer various sharing and collaboration options. Here's a guide on how easy it is to share you photos from your Photobucket account.
Backing up and storing your videos online doesn't have to be a daunting task. By following these simple steps, you can protect your precious memories and creative endeavors with ease. Remember to choose the right cloud storage, organize your videos, upload in batches, set up automatic backups, and double-check your backups for peace of mind. Now, go ahead and capture those magical moments, knowing that your videos are safe and sound in the digital realm. Happy filming!